

How to Schedule a Recurring Course Meeting
Once your Canvas shell for the upcoming semester has been created, you are ready to schedule your recurring Teams meeting with your students.
The following instructions are only for scheduled class/course meetings with students in Teams.
If you want to schedule a general meeting not related to a scheduled class, please refer to the Teams Guide webpage.
There are three steps to schedule a recurring course meeting:
- Enable Microsoft Education in Canvas
- Create a Teams Meeting in Canvas
- Select the settings for the meeting series
Please follow the step-by-step instructions below:
- 1. Enable Microsoft Education in Canvas
To enable Microsoft Education, open the Microsoft Education App in the specific Canvas course. Please follow the steps below to do so:
- Log in to Canvas from TechExpress QuickLinks.

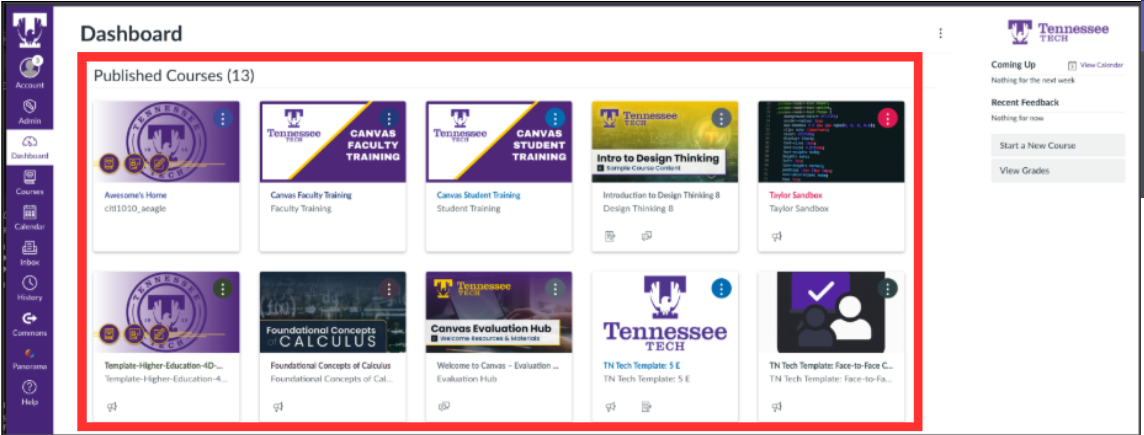
- From your Dashboard, select the course where you want to enable Microsoft Education.
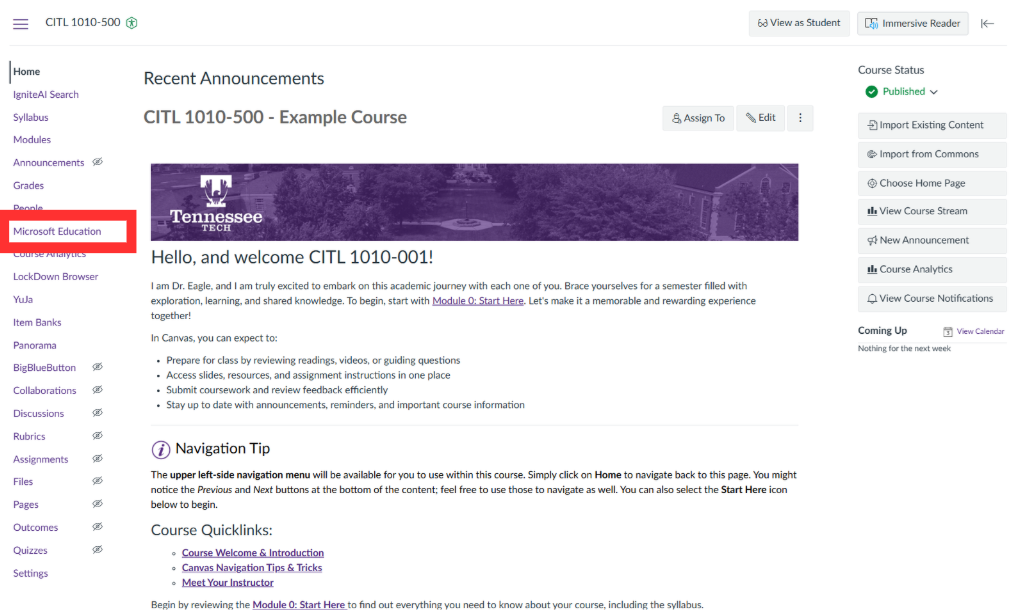
- In the white course navigation, select Microsoft Education.
- » I don't see Microsoft Education in my white course navigation...
No worries! It is simply hidden and you need to follow those few extra steps to make it visible:
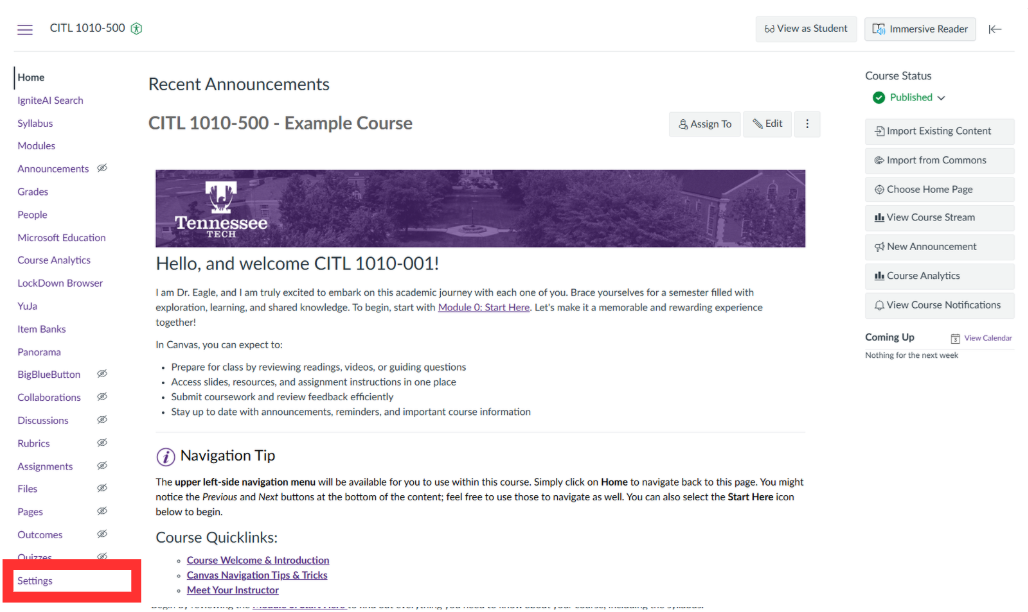
- In the white course navigation, select Settings.
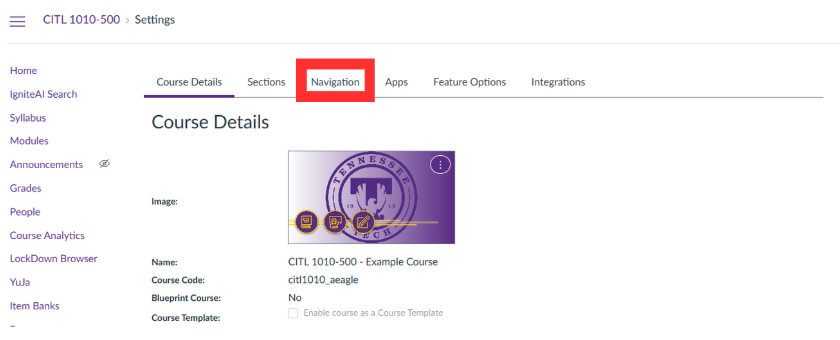
- Select Navigation from the tabs at the top of the page.
- You see two lists of items:
- the first list is the items enabled and visible in your white course navigation.
- the second list is the items NOT enabled and NOT visible in your white course navigation.
- Find Microsoft Education from the second list and drag it in the first list.
Note: the labels are in the order they appear in the course navigation, so place Microsoft Education where you want it to appear in the course navigation.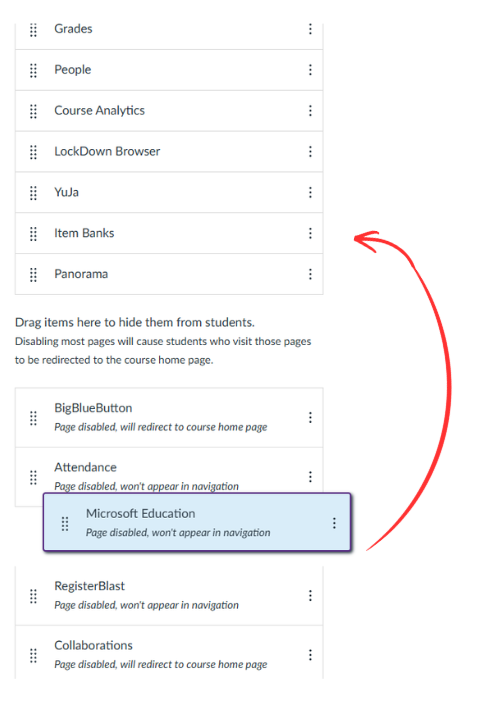
- Click Save at the bottom of the page.

- Microsoft Education should now be visible in your course navigation
- In the white course navigation, select Settings.
- » I don't see Microsoft Education in my white course navigation...
- Once you clicked on Microsoft Education, you will see a message saying "We are setting
up your class".
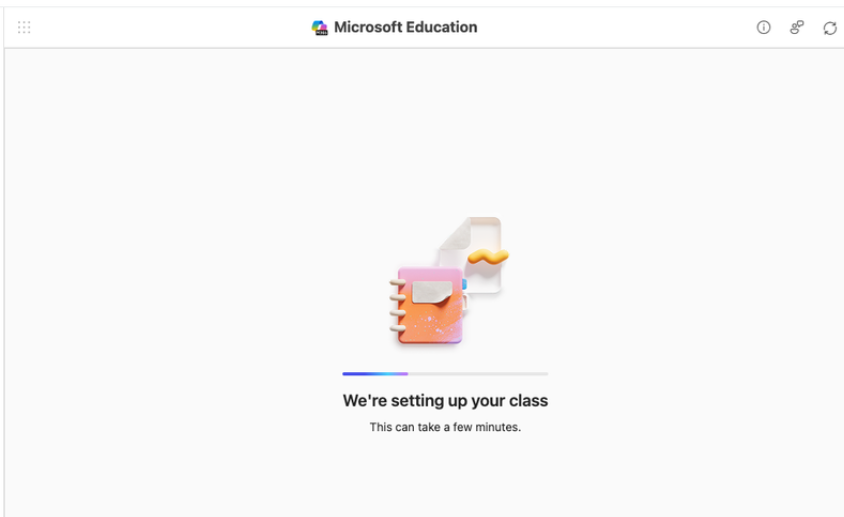
- Once your class is set up, you will see two buttons saying OneDrive and Meetings. Microsoft Education is now enabled for this course!

- Repeat steps 2 and 3 for each course in which you want to use Microsoft Teams.
- Log in to Canvas from TechExpress QuickLinks.
- 2. Create a Teams Meeting in Canvas
Use these steps to schedule a Microsoft Teams meeting directly from your Canvas course
using the Microsoft Education integration.Note: Contrarily to D2L/iLearn, you cannot use the Teams App to schedule a meeting for your class. Everything needs to be done from within your Canvas course shell.
1. Creating a New Meeting
In Canvas,
- From your Dashboard, select the course for which you want to create the meeting.
- In the white course navigation menu, select Microsoft Education.
If you do not see Microsoft Education in your white course navigation menu, it may not have been enabled in this course. Please refer to the previous section "1. Enable Microsoft Education in Canvas". - Select Meetings.

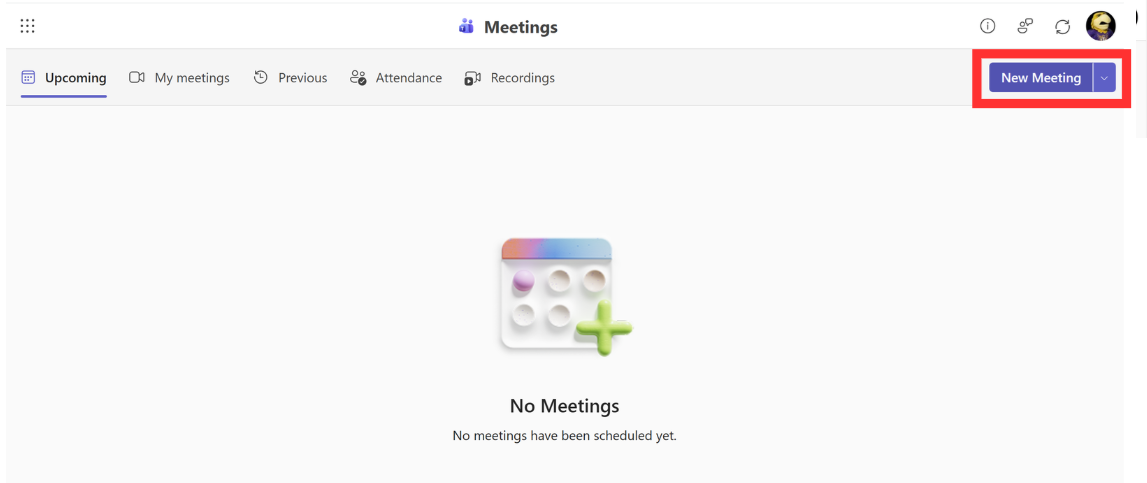
- Select New Meeting.
2. Complete the invitation
Follow the instructions below to complete the scheduling and send your meeting invitations.
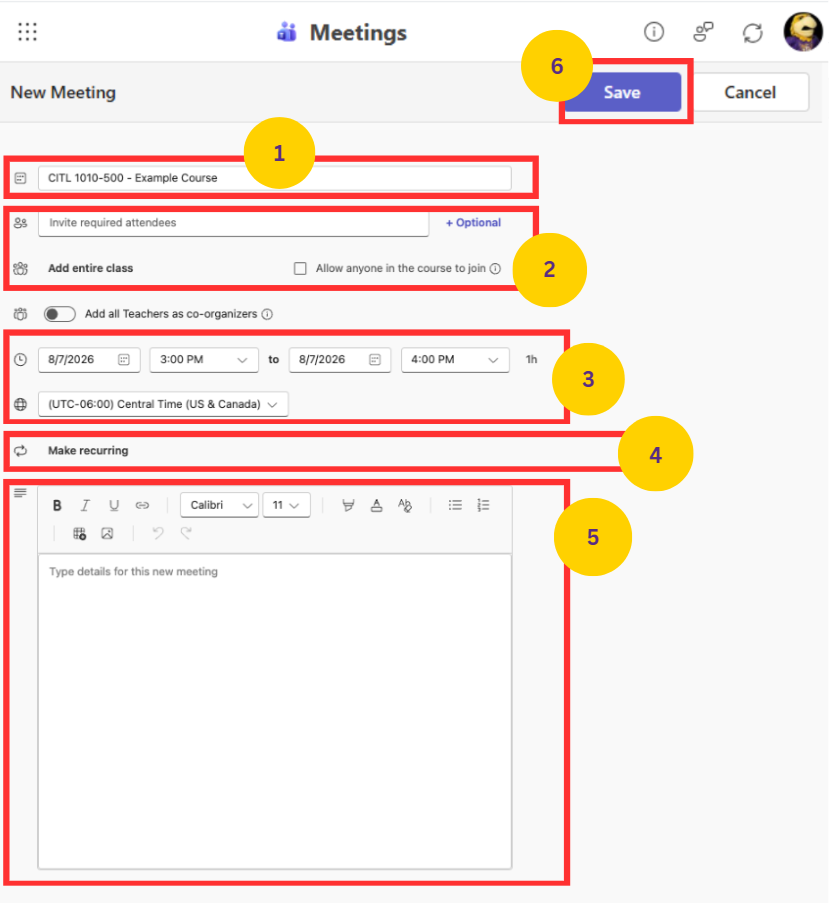
- Change the title to your preferred meeting name.
- To invite everyone enrolled in the course, choose Add entire class.
- Enter the day and time of the first meeting
- Click on Make recurring and enter the recurrence information:
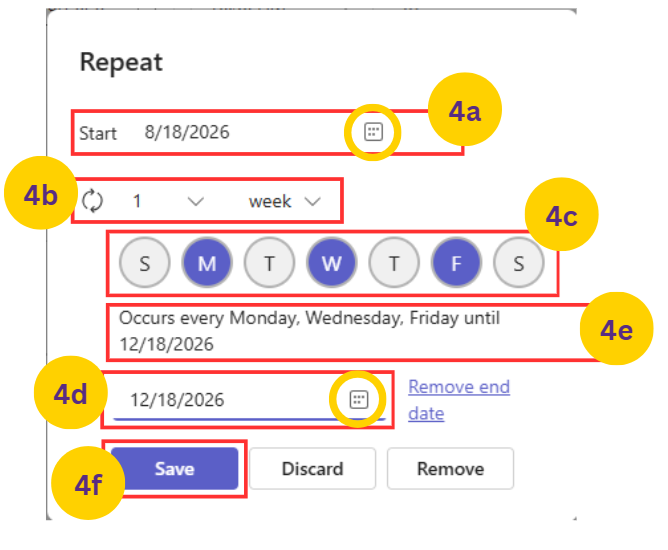
- Select the start date for the meeting series (date of the first meeting).
By default, it will be today's date. To change the date, click on the calendar icon and select a new start date in the calendar. - Select the recurrence pattern.
By default, the meeting should be set to repeat every 1 week. Click the down arrows to change the recurrence pattern. Note that you can only choose to repeat every X days or every X weeks. - Select the day(s) for the meetings.
On the example, we selected a meeting every Monday, Wednesday, and Friday. - Select the end date for the meeting series (date of the last meeting).
By default, it will be the last day the Canvas course is open. To change the date, click on the calendar icon and select a new end date in the calendar. - Check the result.
- Click Save.
- Select the start date for the meeting series (date of the first meeting).
- Optional: Type a description that will be applied to all the meetings: instructions for preparation, goal...
- Click Save on top of the page to finalize the recurring meeting and send the invites to the course roster.
What Happens Next
Your meetings will now appear on the Microsoft Education page in your Canvas course:
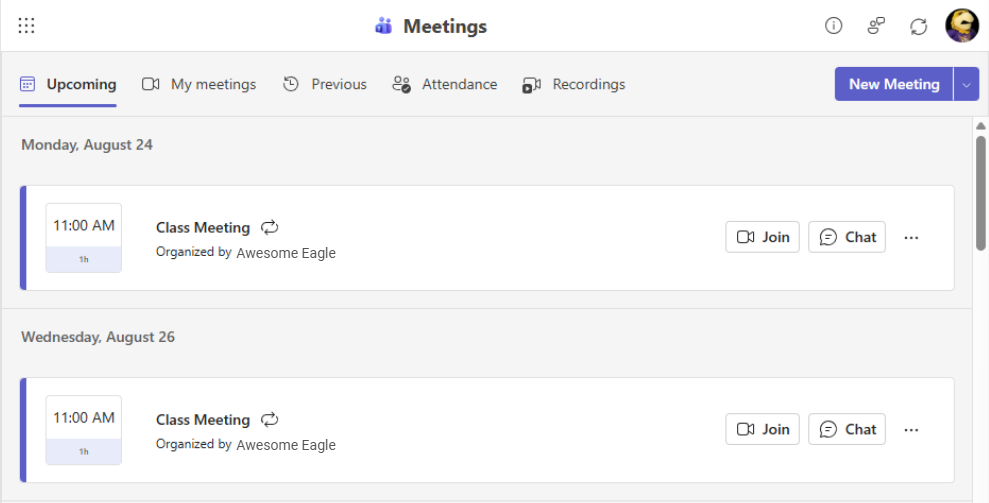
Students invited to the meeting:
- will receive a Teams Meeting invitation by email
- will see the meetings in their Teams calendar
- will see the meetings in their Canvas course calendar
- From your Dashboard, select the course for which you want to create the meeting.
- 3. Choose the settings for your meetings
Teams offers many options for meetings (who is a presenter, recording, transcriptions, camera on or off when attendee join the meeting...). Please visit the Meeting option page to select the settings that best fit your course meetings.
To do so:
- In the Microsoft Education page, find one of the meeting of the series you just created and click on the three dots next to the Join and Chat button of the meeting.
- Select Edit then select Edit series.
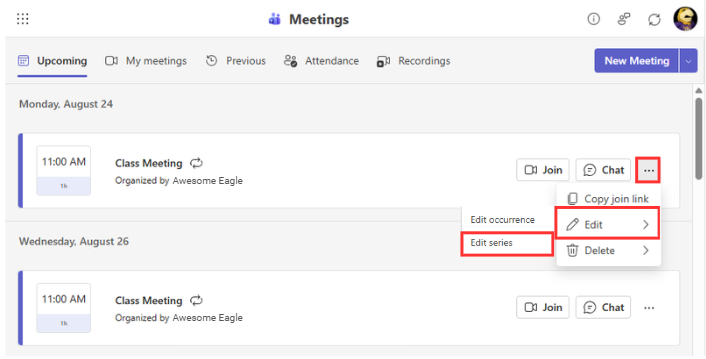
- In the new window, click on Meeting Options at the top.

- A new tab will open in your browser. Scroll through all the options to decide your settings. or select the category you are interested in the navigation panel on the left.
On this page, you can change the organizers and presenters of the meeting, decide if the meeting will be recorded and/or transcribed, or choose if the attendees have their microphones and camera turned on or off when they join. Read the descriptions carefully for each options and select what fits your course meetings.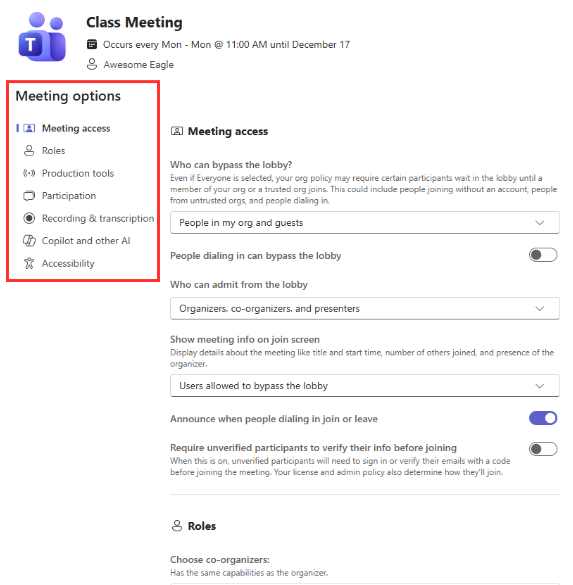
- Click Save at the bottom of the page.
The button will not be active (grayed out) if you made no change; in that case, you can simply close the tab.
- How Will Students Join the Meeting?
Once you send the invitation, students and any other attendees will receive an email to accept the invitation. The meetings will be added to their Teams/Outlook and Canvas calendars, and they will have access to the meetings in the Canvas course.
Any attendee can join the meeting by finding the meeting in their Teams or Outlook calendar and clicking Join.
To join the meeting, students who have access to the Canvas course can also join the meeting by going in the Canvas calendar, finding the meeting, and clicking Join.
- Find the Meeting Join Link
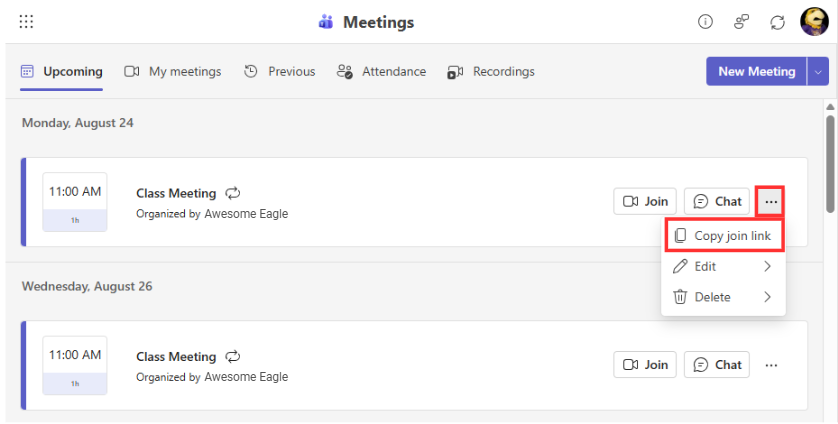
If you need the Join link for a specific meeting or for the whole series to share it with a student or a participant, or to paste it inside a module, please follow these steps:
- Go in the Canvas course.
- Select Microsoft Education in the white course navigation.
- Find the meeting in the list of scheduled meetings.
- Click on the three dots next to the meeting.
- Select Copy join link.
- You can now paste the Join link in an email or in a module to share the link.
- Edit One Meeting or the Whole Series of Meetings
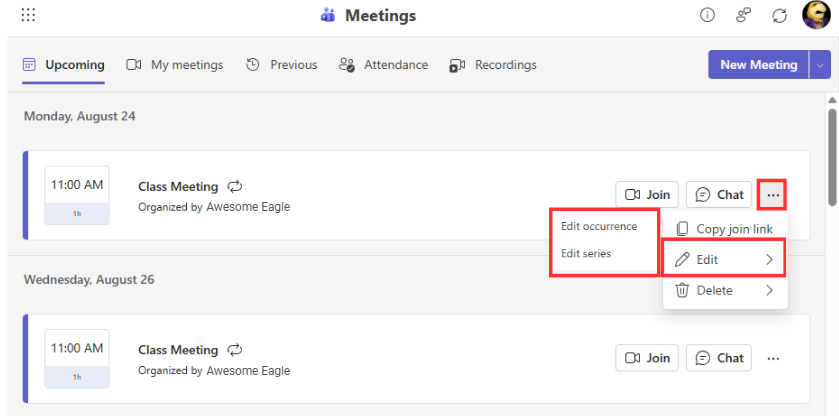
To edit the details of ONE meeting or ALL the meetings in a series:
- Go into the concerned the Canvas course.
- Select Microsoft Education in the white course navigation.
- Find the meeting you wish to edit (edit only one meeting)
OR find any meeting in the series you wish to edit (edit the whole series). - Click on the three dots next to the Join and Chat button of the meeting.
- Select Edit.
- Select either Edit Occurrence to edit only this meeting in the series
OR select Edit series to edit every meeting in the series - Make your changes in the new panel.
- Click Save.
- Check the result on the Microsoft Education page.
- Delete One Meeting or the Whole Series of Meetings
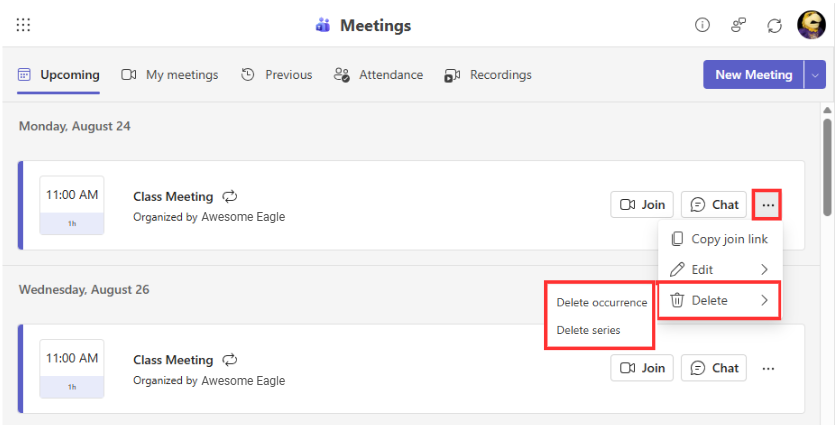
To delete ONE meeting or ALL the meetings in a series:
- Go into the concerned the Canvas course.
- Select Microsoft Education in the white course navigation.
- Find the meeting you wish to delete (delete only this meeting)
OR find any meeting in the series you wish to delete (delete the whole series). - Click on the three dots next to the Join and Chat button of the meeting.
- Select Delete.
- Select either Delete occurrence to edit this one meeting only in the series
OR select Delete series to edit every meeting in the series - Confirm your choice in the new window by clicking on Delete.
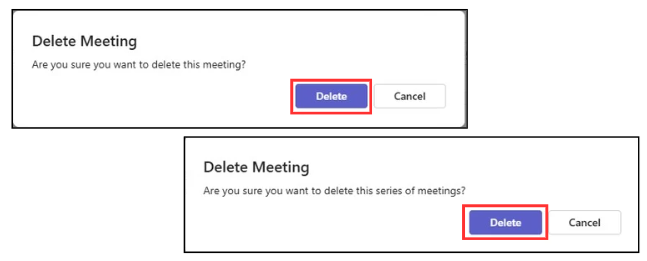
- Check the result: the meeting(s) should no longer be visible on the Microsoft Education page.
If you have any questions during this process, you are welcome to reach out to the CITL for help at CITL@tntech.edu.