
MidTerm and Final Grades in iLearn
We realize the Grades area can seem very complicated, depending on what you would like to do with your grades. While there are many different configurations for a gradebook, we are going to highlight some of the most common scenarios we see. If you have a different setup, please feel free to reach out if none of these apply.
Default Grade Settings for a New Course
-
- Grading System: Points grades
- Grade Calculations: Treat ungraded items as 0
- Final Grade Released: Final Adjusted Grades
- This grade is not released by default, but if you choose to Release All in the Final Grades area, it will be the one visible to students.
Grades Scenarios
- I want to show my students their overall MidTerm grade.
- I want my students to see their up-to-date grade in the course all semester.
- I want to adjust my student's grades at the end of the term.
I want to show my students their overall MidTerm grade.
- Go to Grades
- Select Manage Grades

- Select New – Item, then select Calculated from the item options.
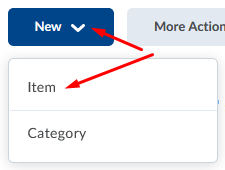
- Select the items that should be completed to this point.
NOTE: If you have selected Drop Ungraded Items selected for the overall Calculation Options and you haven’t entered a grade, the item will not be calculated in the MidTerm grade. You must enter a grade or a zero (0) to make sure the grade is calculated correctly.
- Select Save and Close
I want my students to see their up-to-date grade in the course all semester.
In this scenario, we walk through setting up the Grades area to allow students to see their current grade throughout the semester. By default, the grade released is the Final Adjusted Grade. This will need to be updated as well as some other settings to accomplish this goal.
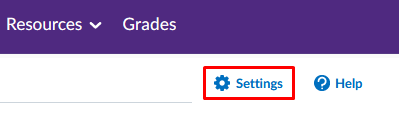
- Go to Grades
- Select the Settings link in the upper right.
- Go to the Calculation Options tab, make sure the following settings are selected.

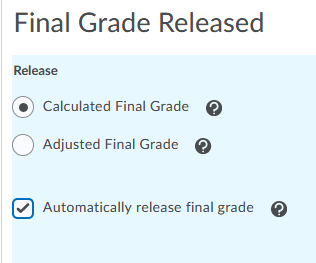
- Under Final Grade Released, choose Calculated Final Grade and Select Automatically release final grade.
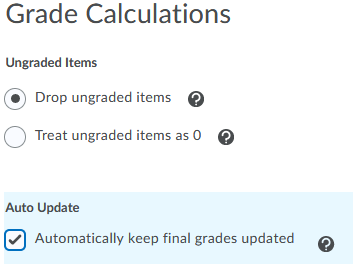
- Under Grade Calculations, select Drop ungraded items and Automatically keep final grades updated.
- Under Final Grade Released, choose Calculated Final Grade and Select Automatically release final grade.
- Select Save, click Yes to continue.
NOTE: The Drop ungraded items option will not calculate a grade that has not been entered. Therefore, you must put a zero (0) manually if you someone does not complete the assessment.
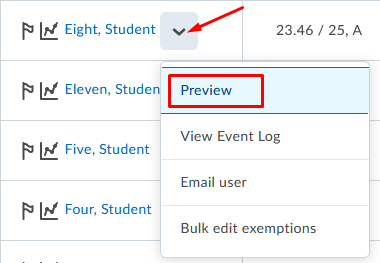
- To test whether the students see this grade or not, go back to the Grades and the Enter Grades Select the arrow to the right of any student and select Preview. Review the window that appears. The grade should be showing at the top of the window.
If the grade is not showing, you will need to check the following:
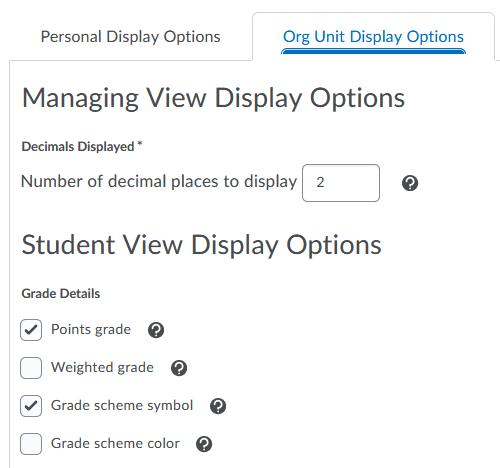
- In the Settings area, select the Org Unit Display Options Review the Student View Display Options. The Grade scheme symbol must be checked for the student to see their Final Grade.
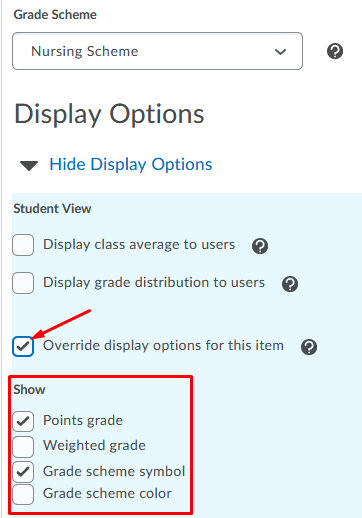
- If you prefer to only allow them to see the percentage scores on the Final Grade and
not for all grades, go to the Enter Grades area and select the arrow to the right of the Final Calculated Grade column title. Select Edit, then scroll down and update the Display Options for the Student View. Make sure Grade scheme symbol is selected.
I want to adjust my student's grades at the end of the term.
By default, the Adjusted Final Grade is the final grade column that is setup to be released to students at the end of a term. If you wanted to followed the steps to allow students to see a running total grade for the entire term, you will just need to change the Final Grade that is released and then transfer and edit all the grades.
- Go to Grades
- Select the Settings link in the upper right.
- Go to the Calculation Options tab, make sure the following settings are selected.
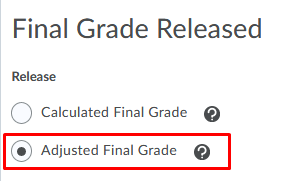
- Under Final Grade Released, choose Adjusted Final Grade.
- Select Save.
- Go to Grades and when viewing the Enter Grades area, select the arrow to the right of the Adjusted Final Grade.
- Select Enter Grades.
- Select the arrow to the right of the Final Grades title at the top of the page.
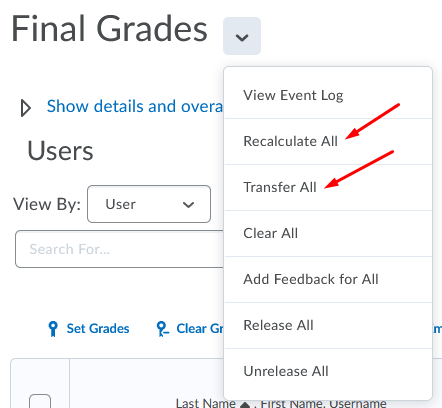
- If you have kept your Final Calculated Grades up-to-date all term, select Transfer All, click Yes to confirm.
- If you would like to calculate the adjusted grades, select Recalculate All.
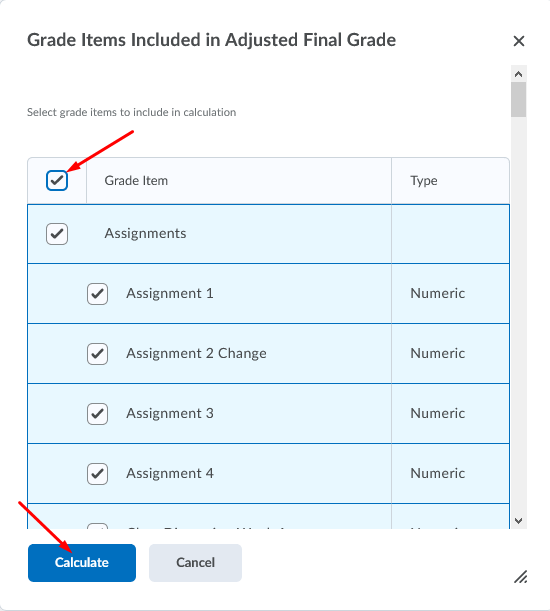
- When you select this, you can choose Select All grade items by selecting the top checkbox.
- If there are items you want to throw out of the calculation, you can uncheck those items so it removes them from the grade calculation for all students.
- Click Calculate, then Yes to confirm.
- If the grades do not show a Released icon (looks like an eye ball) or they show the
icon with a slash through it next to the grade, you will need do the following:
-
- Select the arrow to the right of the Final Adjusted Grade column and choose Enter Grades.
- Select the arrow to the of the Final Grades title at the top of the page, choose Release All.
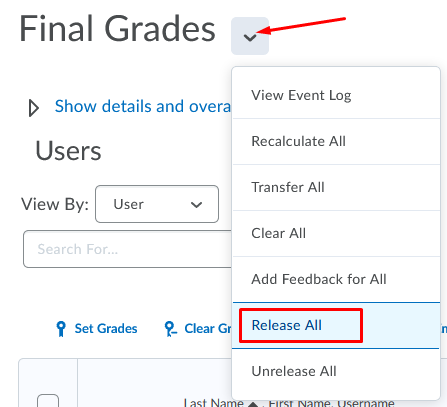
- Select Yes then Save.
-
If you have a different scenario where you have certain grades that should not be counted for specific people, you can use other methods to do this. Consider using exemptions or manually calculating their grade and unchecking the items that should be removed.


