
Points Grading System in iLearn
There are two grading systems available in iLearn, Points and Weighted. Points adds up all the points for the grade items in the course. Weighted works out of a total of final grade worth 100%. The default grading system in iLearn is Points.
Changing the Grading System to Points
The Points grading system should be the default, but here is where you can double-check.
- Go to Grades
- Select Settings in the upper right corner

- Choose the Calculation Options tab
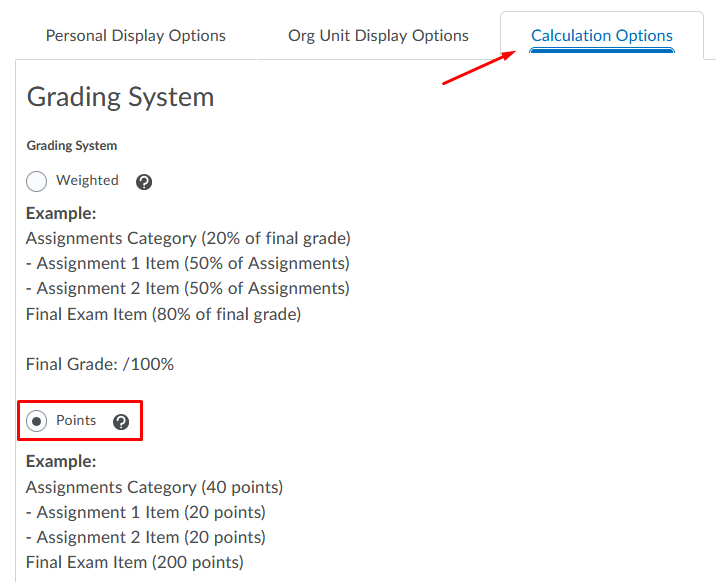
- Choose Points
- Click Save
- A confirmation box will appear, click Yes.
Defining Your Categories and Items
Once you have your grading system set, we will begin creating the appropriate categories and items. If you are starting from someone else’s course content, you will want to get familiar with the grade setup that exists. For this purpose, let’s assume we are starting with nothing.
When setting up your grades, whether you use Points or Weighted, it is a good idea to start with Categories. These organize the specific grade items into groups to make it simpler for students. If you only have one grade for something, a category might not be necessary. For example, you give one participation grade at the end of the term. You can just add that as an item at your top level (not in a category).
A simple gradebook might have any the following categories (or others):
- Assignments
- Quizzes
- Exams
- Projects
- Participation
Adding a Category
- Go to Grades
- Select Manage Grades
- Select New – Category

- Enter the following information:
- Name
- Check Can Exceed if there are items in the category that can be assigned more than the maximum points. For example, if Assignment 3 is worth 100 points, but has 2 bonus points that can be earned pushing them to 102, you will need to make sure that Can Exceed is selected so the extra 2 points are not lost.
- If this particular item should be excluded from all student’s final grade calculations, choose Exclude from Final Grade Calculation. If only a single student or subset of students needs to be Exempt, you can use the Exempt options when grading.
- Select your Distribution Option
If all of the items under a category are worth the same point values- Select Distribute points across all items.
- Enter the Points per item
- If you would like to drop a grade, enter the number of high or low grades to drop.
This will not include Bonus item grades.
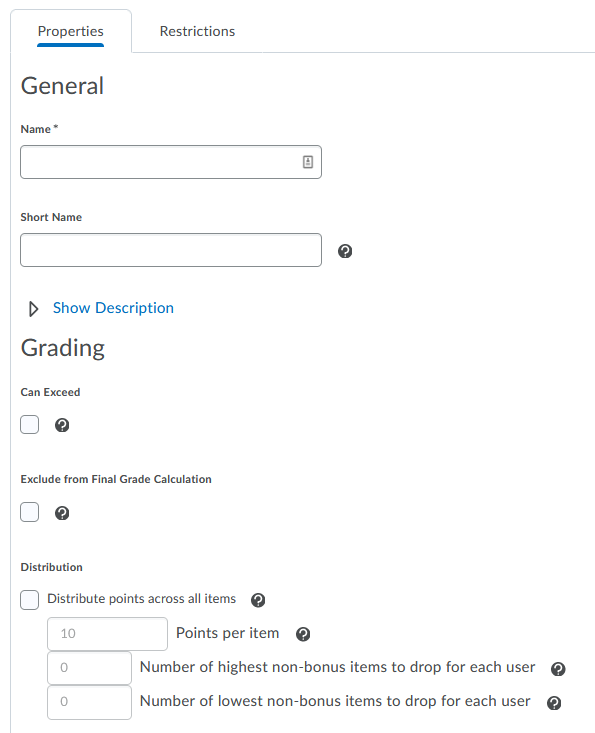
- Select Distribute points across all items.
- Choose Save and New to add a new category, or Save and Close if you done.
Adding Graded Items
We are going to focus on adding Numeric grades here, but there are other types of grades. Learn more about how to use the Calculated grade item to create a Midterm grade.
- Go to Grades
- Select Manage Grades
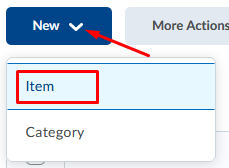
- Select New – Item
- Select Numeric
- Enter the following information:
- Name (This shows for the students.)
- Example: Assignment 1: Chapter 1 & 2 Summary
- Short Name (This shows for instructors and graders. If you have a lot of grade items we recommend
using shorter names to help keep your gradebook manageable).
- Example: A1 or Assignment 1
- Select a Category
- Enter the Maximum Points for the item.
- Weight
- If you chose either of the Distribute weights automatically, this will be grayed out once you choose the associated category. For the first item in the category, it will be 100%. When you add two, 50%/50%. And so on.
- If you are manually assigning the weights, you will enter the weight here for the
item within the category.
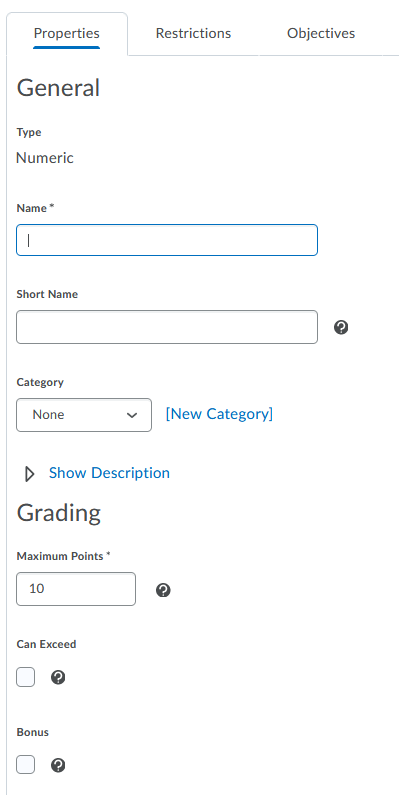
- Additional Options:
- If the item can be assigned points beyond the maximum points, make sure to check Can Exceed.
- If you would like to have a Bonus item, select Bonus. This will not count against a student, but if they get points, it counts them.
- Make sure if you choose Bonus items, you also select Can Exceed at the Category level and Final Grade level so they get calculated where needed.
- If you have setup a Grade Scheme, you can select that here. If you decide you would like to use a letter scheme, you can create one for the course (this would be associated under Settings) or you can use it for specific grade items. Learn more about Grading Schemes.
- Rubrics can be added to a grade item, if you plan to manually grade the item in the Grades area. If you plan to associate this grade item with an assessment, you will not want to add the rubric here. You will want to add it to the assessment.
- Name (This shows for the students.)
- Select Save and New to continue adding items, or Save and Close when you are done.


