
Managing Digital Signage Announcements: Playlists
Feb. 8, 2021 Update: REACH has fixed the cut-and-paste playlist issue, and has reincorporated drag-and-drop in an additional aspect to the feature! For more details, see the section on Changing Announcement Order in the guide below.
On December 14, 2020, REACH rolled out an update to their Announcements area. The original Announcements module went away, replaced by two new areas: Media Library and Playlists. If you missed out on participating in the open trainings in December, or would like additional training on these areas, feel free to sign up for training!
In this guide, we'll go over the Playlist module. A guide for the Media Library module is also available for your reference.
If you have any questions about the update, please feel free to contact us using the form below!
Announcements vs. Media Library and Playlists
Previously, Announcements served both to organize playlists and as the place where
announcement posts were created. The December 2020 update separates those two functions
and makes them more convenient to manage. You’ll still be able to do all the things
you can currently do in Reach; it’ll only change how you go about it a little. You’ll
upload and organize content in your Media Library, and you’ll publish content from
the Media Library in the Playlists view.
Playlists
In the Playlists view, you’ll see a list of the playlists in your facility. You should
recognize these playlists, as they’re the same playlists you had in the Announcements
view previously! Double-clicking the playlist will bring up a view showing you the
full list of announcements published to this playlist.
Adding Content
Similar to the old Announcements view, you can add, delete, activate, or deactivate published announcements in this view. To deactivate an active announcement, simply click the switch in the “Status” column. Announcements can be selected by simply clicking on them. You can then choose to delete the selected items, copy them, or mass activate/deactivate by clicking the three small menu dots and selecting “Activate Checked Items” or “Deactivate Checked Items”.
You can add content to your playlist by clicking the “+ Add Content” button. You’ll
see a pop-up window showing you a view of your Media Library, from which you can select
any announcements you’ve already uploaded and prepared. Otherwise, you can also click
the “Upload Files” button at the top of this window. It will open the same dialogue
box as you saw in the Media Library to upload JPG, PNG, PDF, or video files (remember
to never upload Word, Excel, PowerPoint, or Publisher files unless you have already
converted them to correctly sized PDFs or images).
Scheduling Content
Once you’ve selected the announcement you want to add to the playlist, hit “Next”, and you’ll see the “Publish Settings” dialog box. This functions exactly as it did before, with the addition of the “Advanced” tab, which allows you to choose time slots for your announcement to be active if you wish.
As before, your announcement will automatically be set to run 24/7 with no end date, as pictured in the first screenshot below. If you'd like to set an end date for your announcement, click the “No End Date” toggle switch and then select an end date for your content. The content duration and the full screen options should not be changed.
Reminder: Content should nearly always be set to a duration of 10 seconds. If you feel your announcement needs more than 10 seconds, there is likely too much text on the announcement. Consider adding a link to a page where the viewer can find additional information instead!

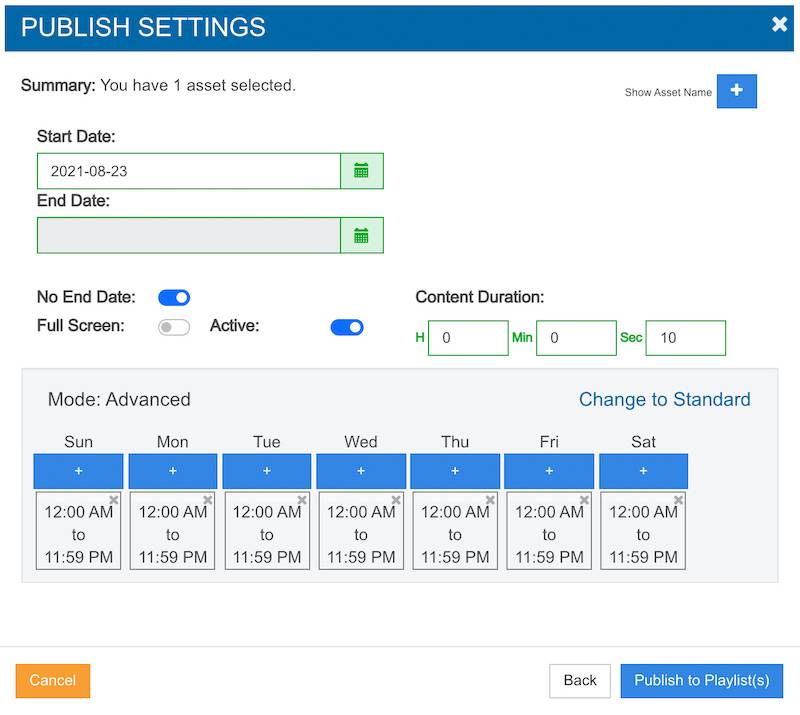
Previously, if you wanted an announcement to run during certain intervals on the same
day (such as 10 AM to 11 AM, and then again at 1 PM to 2 PM) you would have had to
upload the announcement twice and schedule each accordingly. Now, on the Advanced
tab, you can handle all of that on the same announcement; no need to upload it twice!
Simply remove the original time slot (12:00 AM to 11:59 PM) by clicking the small
“x” and then click the “+” button and add the time slots during which you’d like your
announcement to run.
Changing Announcement Order
To change the order in which your announcements play, select one or more playlist items by clicking them; a dotted line will appear around the selected announcements. Once you've selected the items you wish to move, click "Cut Items". They'll briefly disappear from your playlist, but a down arrow on the "Cut Items" button will show you which items you have cut, or allow you to restore those items back to their place in the playlist.
When you're ready to proceed, simply click wherever you would like to insert them, click the blue wrench button on that item, and select "Paste Here". A dialog box will appear with two columns: "Cut Items" and "Paste to Playlist". Simply drag the item(s) from the "Cut Items" column to the "Paste to Playlist" column. You can easily change whether your pasted item will appear above or below by dragging it to a new placement, and if you cut multiple items, you can drag-and-drop these items in any order you choose. When you've got an order that works for you, hit "OK". That's it!
This feature allows you to quickly and easily move a large number of playlist items
(or simply one or two) in the play order, and the additional drag-and-drop aspect
REACH has incorporated makes manipulating the order of multiple items a breeze!
Copying Announcements to Another Playlist
To copy an announcement (or many announcements!) from one playlist to another, simply
select the announcement(s) you'd like to move and then select the "Copy Items" button.
You'll then be able to select the playlist you'd like to copy the items to.
Need assistance?
If you have any questions about the new REACH update, or would like an in-depth walkthrough, we’d be happy to help! Feel free to contact us using the form below with any questions, or book a REACH Mini-Training if you can’t attend the open trainings but you’d still like to go over the update together.